Posts

Top Wing Skins (Right) 16-3-3, 16-4-4

Image
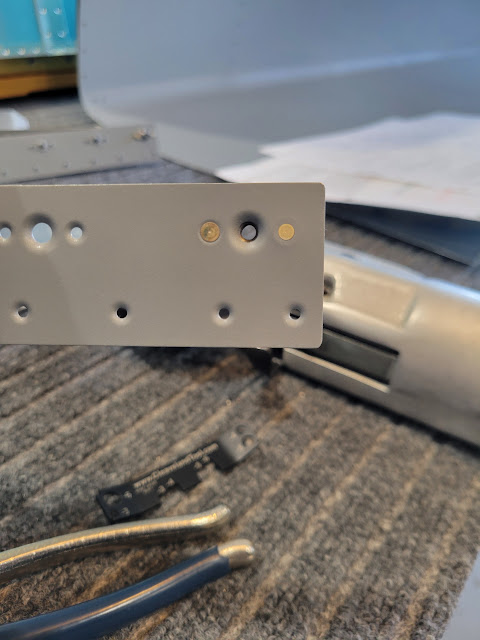
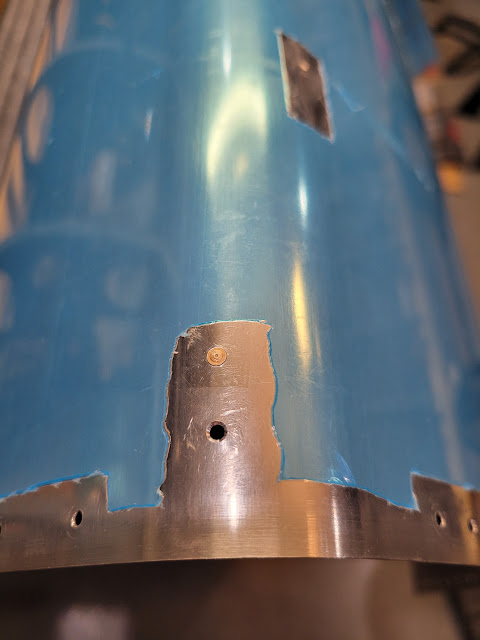
Continuing on with top skin riveting on the right wing, my daughter and I completed most rivets on the outboard skin (except for those near the skin overlap), and started riveting the inboard skin from the center outward. Getting close to completing all rivets on the right outboard top skin. Very happy with the results so far. Starting to rivet the right inboard top skin to the ribs I put tape over the universal head rivets at the inboard end of the rear spar to avoid scuffing them while riveting the skin to the rear spar Outboard top skin fully riveted except for the skin overlap area With the outboard top skin riveted all the way to the outboard edge, I was now able to rivet in the outboard aileron bracket. I started by riveting the bracket to the rear spar first, but decided to delay riveting it to the outboard rib because I'll need to move the wing assembly a little to make additional room for the rivet gun. Outboard aileron bracket riveted to the rear wing spar Next, my daught

Wing Outboard Leading Edge 17-3-11 to 17-4-1

Image
I started final assembly of the outboard leading edges by first riveting the nutplates to both left and right splice strips. I had previously decided to dimple the nutplate attach holes rather than countersink them as suggested in the plans, but realized that the aft most nutplate attach hole at the ends of each splice strip would interfere with the wing spar step bars when the leading edge was attached. To remedy this, I flattened out those 4 dimples and instead hand countersunk those holes using the deburring bit to fit a NAS 1097 3-3.5 "oops" rivet. This allows me to squeeze the rivet and still have adequate clearance to not interfere with the spar step bars when the leading edge is attached. All splice strip nutplate attach rivets were squeezed using the pneumatic squeezer. Aft most nutplate installed in the splice strip. Note the "oops" rivet head is slightly smaller than a standard AN426 rivet head You can see the difference in height of the shop head of the &

Priming - Wing Outboard Leading Edge 17-3-10

Image
With all outboard leading edge parts dimpled, I moved on to priming them. Nothing complicated here, just had to keep track of the position of each rib in the leading edge using tags. Right outboard leading edge ribs, skin stiffeners and splice plates prepped with EkoEtch Outboard leading edge internal parts primed with EkoPrime. Only the left leading edge ribs remain to be primed. Since the weather was perfect for priming, I also took time to prep and prime the outbaord leading edge skins. Skin ready for cleaning with EkoEtch Right outboard leading edge skin etched and ready for priming Left outboard leading edge skin etched and ready for priming Outboard leading edge skin primed  Left leading edge ribs primed. Now all parts in both leading edges are ready for final assembly Primer used:   ~380g + 38g distilled water Time Taken:      6.6  hours Dates:                    April 11 - April 21 2024 RV-10 Build Total Time:      647 .0  hours Priming Total Time:                80.0  hours  (

Wing Outboard Leading Edge 17-3-9, 17-3-12

Image
In-between top wing skin riveting sessions, I continued working on the outboard leading edges.  First off I filled the stall warning slot holes in both leading edge skins as I will not be installing the standard stall warning system (instead going for an angle-of-attack indicator).  To fill these holes, I decided to deviate from the plans, and instead used NAS1097 "oops" rivets. The advantage of using these, as opposed to standard AN426 rivets, is that they require only a shallow countersink to sit flush, rather than a full 3/32" dimple. rv10.org also suggested that a dimple at this location might deform the curve in the skin, so I chose to countersink instead. After countersinking, the "oops" rivets were set using the Cleaveland Main Squeeze as I wanted full control over this process. I did run into an issue, however, while adjusting the squeeze depth as one of the left leading edge rivets did not sit entirely flush, and after squeezing I noticed some minor de